Posts filed under Hardware

Install a Viofo A119 Mini Dashcam in a Kia EV6

Viofo A119 Mini Dashcam

I recently decided to get a dashcam for my new Kia EV6. Previously I decided against a dashcam mainly because of the hassle of hiding the cables. I’m not a fan of seeing power/USB cables running through the car. That was until I ran into a Dongar power adapter that runs of the rearview mirror power. This means that I don’t have to bother with running cables through and behind the interior of the car.

So having found a nice alternative of routing cables I decied to do some research on which dashcam. After several hours of researching I bought the Viofo A119 Mini Dashcam. My reasons of selecting this one are;

  • WiFi support

  • 1440p (4k is nice, but you need a lot of storage)

  • Numerous parking modes incl. timelapse, motion detection (visually, and through a motion sensor)

  • Relative small

  • Decent reviews

The dashcam arrive the next day, and the Dongar adapter was still on it’s way (ordered July 8th). This meant waiting… Something I’m not really good at 😃. So I decides to give it a try without the Dongar adapter, and use the included hardwire kit (which offers recording of events when the car is powered down).

First; research in how to dismantle the interior.
I was not able to find any youtube video’s on the EV6, but I found a video on routing cables through a Kia Forte.

This video mentions a connector at the near top of the A-pillar that needs to be detached. Problem is that I wasn’t able to figure that out. Either I’m missing the right tools, of my fingers are too thick.

An image I found also describes how to detach the A-pillar cover.

After 20 minutes of frustration I was ready to give up. I had to wait for the Dongar adapter… Until I remembered that I had a nylon interior disassembly kit laying around somewhere.

Not that this helped in detaching the A-pillar covering though 🙁…

When reassembling the interior I saw that I could see the windshield through the bottom of the demi-detached covering. This was below the airbag and some connectors that are placed behind the covering. I don’t have an image of it, but the following image should give an idea on the approximate location.

Don’t feed it throw the airflow vents. When the cover is detached on the top you can see through and see the windshield.

Being able to see the windshield/front window It gave me the idea to feed the dashcam powercable through here. This went fine until the ferrite bead in the cable had to pass the plastic covering on the windshield side. Even after trying to bend the A-pillar cover with the nylon tool (second tool from the left in the image above) I wasn’t able to push the cable through.

If I can’t push it through I could try to pull it through with a piece of metal wiring. This seemed to do the trick. I fed a wire from front to back (yellow arrow), attached the power cable and pulled it through.

The red arrow is the direction the cable runs eventually, but is also the direction I had to manoeuvre to pull the cable through, since you get a bit more space the more you go higher. Don’t apply to much force, because you’re working near the airbags!

After I was able to pull the ferrite bead through, the rest was a piece of cake. It’s quite easy to push the cable behind the ceiling covering and guide ti to its final destination.

To get the cable into the fusebox, there’s a small opening between the pastic you can route the cable through.

For connecting the power cables into the fusebox I bought a set of MICRO2 adapters (available at Viofo). These hold the correct fuse size used in the Kia EV6.

Connecting these was also a challenge, since the connector is to big to correctly insert into the fusebox. Some filing was involved to remove the excess plastic on the connectors (remove some plastic on the front and back of the connector).

This results in the following fusebox view;
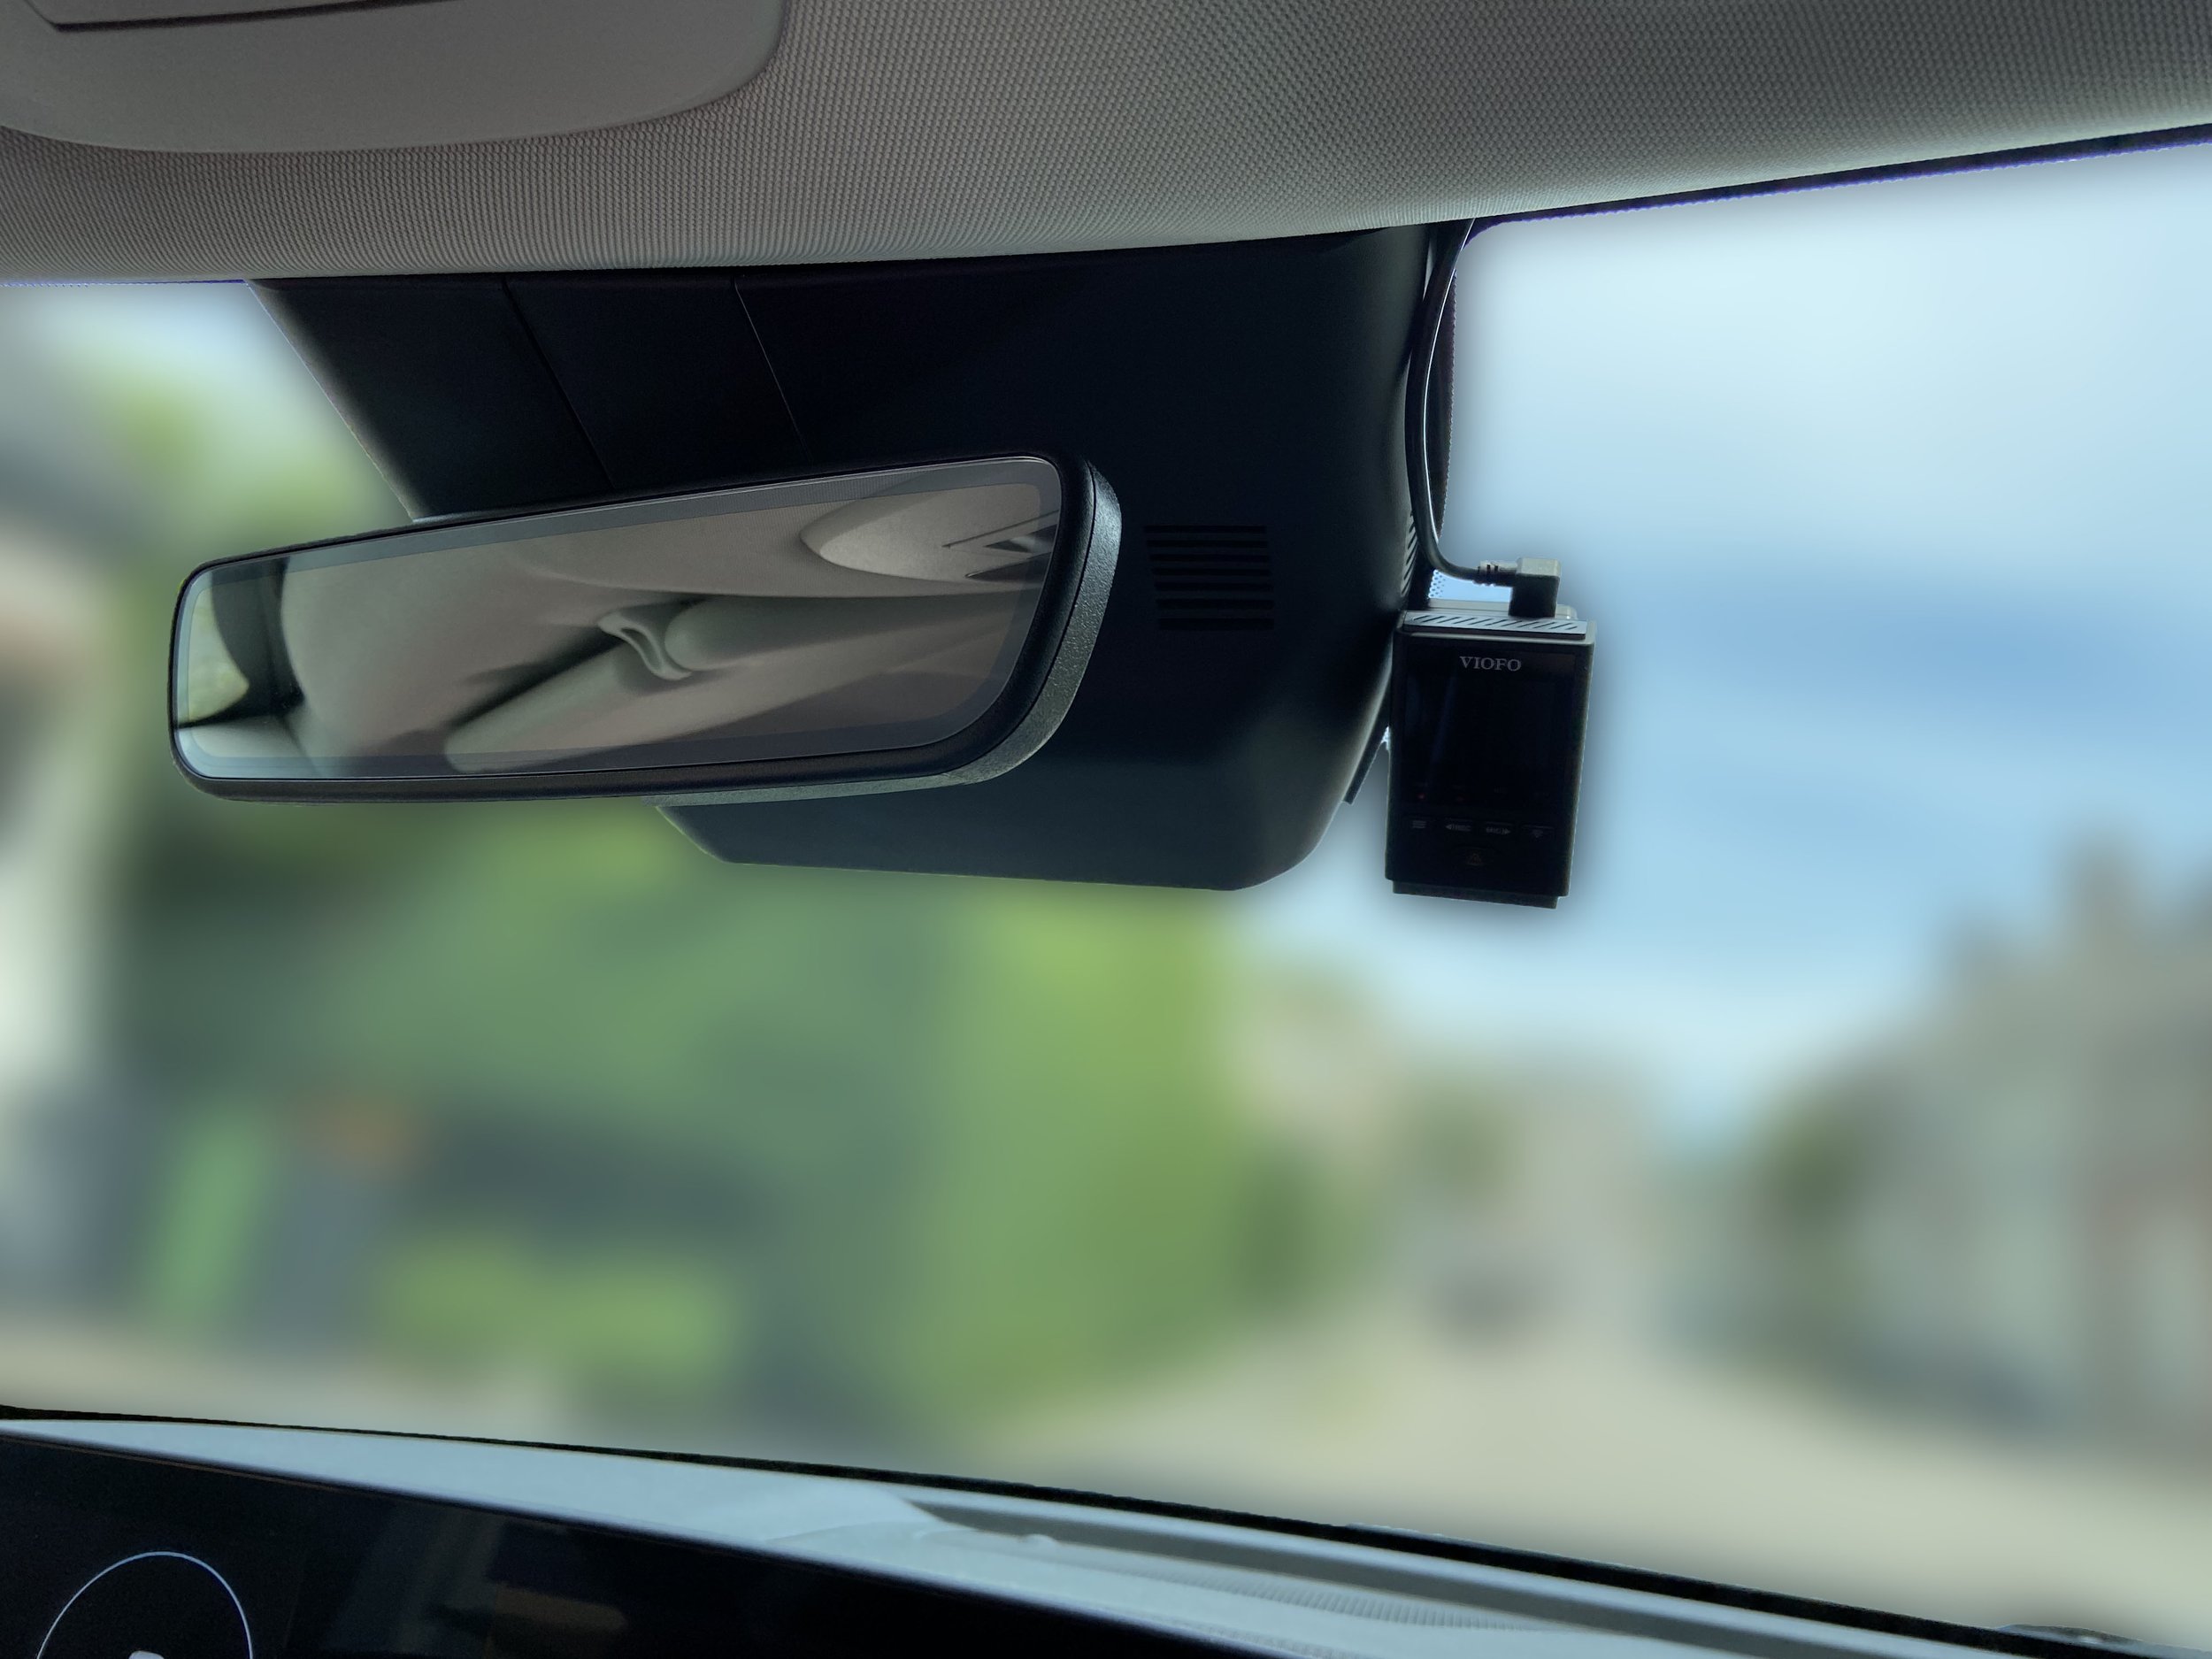
The final result:

Posted on August 1, 2022 and filed under Gadgets, Tips'n Tricks, Hardware.

Fortiswitch And SFP's

Last month, I started to update my lab network. The old Juniper EX ‘core’ switch was replaced by a FortiSwitch 108E-POE. The problem was that the Juniper had 14 * 1Gbps interface, and the FortiSwitch only 8, with an additional 2 * SFP Gb ports.

A couple of well known venders ship hardware that won’t allow offbrand (cheaper) SFP’s, but the FortiSwitch has no issues with a mix of vendors. Currently it hold an (ancient) Tippingpoint 1Gbps SFP (RJ45) and a new Ubiquity 1Gbps SPF (RJ45).

fortiswitch # get switch modules detail ____________________________________________________________ Port(port9) identifier SFP/SFP+ connector Unk(0x00) transceiver 1000-Base-T encoding 8B/10B Length Decode Common length_smf_1km N/A length_cable 100 meter SFP Specific length_smf_100m N/A length_50um_om2 N/A length_62um_om1 N/A length_50um_om3 N/A vendor UBNT vendor_oid 0x000000 vendor_pn UF-RJ45-1G vendor_rev vendor_sn X20092805573 manuf_date 08/18/2020 ____________________________________________________________ Port(port10) identifier SFP/SFP+ connector Unk(0x00) transceiver 1000-Base-T encoding 8B/10B Length Decode Common length_smf_1km N/A length_cable 100 meter SFP Specific length_smf_100m N/A length_50um_om2 N/A length_62um_om1 N/A length_50um_om3 N/A vendor AVAGO vendor_oid 0x00176A vendor_pn ABCU-5700RZ-TP1 vendor_rev vendor_sn AN1006ANNX manuf_date 02/13/2010

I wouldn’t advise this in any production environment, but for a home/dev environment it works (so far) and it’s (much) cheaper. The Ubiquiti SFP was around €25 (retail) here in the Netherlands, which is about a fifth of the official Fortinet SFP price.

Posted on October 25, 2021 and filed under Hardware, Tips'n Tricks.

Replace Intel NUC8 Fan (model: BSC0805HA-00)

About 2 years ago I bought an Intel NUC 8 to be used as a Linux server at home. Since it runs 24/7/365, it’s just a matter of time when the fan will fail. That time was about 5-6 weeks ago.

NUC8 Fan Model BSC0805HA-00

NUC8 Fan Model BSC0805HA-00

The internal fan (model: BSC0805HA-00) of the NUC 8 is not your average computer fan, and it’s also different from the earlier and later NUC versions. The fan for the older and newer NUC versions are abundantly available online through the regular channels. Not so much luck for the NUC 8 model…

There are some vendors on AliExpress that sell this type of fan. The problem is that I normally buy stuff from vendors that have sold hundreds of the item I want or need (there’s a difference :-) ).

Since there was no Dutch or European shop that had these fans in stock I had to try. It was that or buy a new NUC ($$$).

The fan I bought on AliExpress was ~$25USD, which was basically the cheapest option available. It arrived after about 3 weeks and it looked like the real thing.

On the left the new AliExpress fan. On the right the old noisy fan still attached to the NUC

On the left the new AliExpress fan. On the right the old noisy fan still attached to the NUC

After replacing the fan it was dead-quiet again in my room (and yes, the fan still moved air through the NUC). Now fingers crossed that this fan holds out for another 2 years.

B.t.w. If you’re looking for instructions on how to disassemble the NUC; just try YouTube

UPDATE @ 08-20-2022: The fan actually lasted a little bit more than a year. I ordered a new fan (from a local NUC ports supplier) yesterday. Let’s see how long that fan will last.

Posted on July 29, 2021 and filed under Hardware.

Xiaomi Xiaofang Wireless Camera Custom Firmware Hack

A colleague of mine demonstrated a Wyze webcam a couple of weeks before. A nifty little FullHD wireless IP camera that has a decent (iOS/Android) app and cloud connectivity to store the data.
I liked everything about it, except the cloud-storage part. I don’t like it when I don’t know where my private data resides. So I started a to search to see if these devices could be altered to benefit my needs, and guess what, they can be altered.

There’s a github project where they fabricated a firmware hack and with custom software the camera can be used for much more. So now I had to get my hands on the most inexpensive version of the camera. Since there are different brands that ship basically the same hardware with a different firmware, there’s more than enough choice.

Posted on November 19, 2019 and filed under Gadgets, Hardware, Security, Review, Tips'n Tricks.

Enhancing Sonoff TH16 Functionality and Domoticz Integration

In my previous blogpost, the Sonoff worked, but was lacking a manual override. The switch could only be triggered by Domoticz. Since it also has a physical push button (connected to GPIO0 (D3)), it can be switched by hand. All that needs to be done is:

  1. Create a new switch device in the Sonoff
  2. Enable 'Rules' in the Tools / advanced settings
  3. Create a rule
  4. Change the On/Off commands in the switch parameters in Domoticz
Posted on January 1, 2018 and filed under Hardware, Programming, Raspberry Pi, Tips'n Tricks, Domotica.

Flashing the Sonoff TH16 Wireless Switch

The Sonoff TH16 is an inexpensive piece of hardware that can be controlled over WiFi. Apart from the switch (that's capable of handling electrical currents up to 16A) there's an interface for temperature and humidity. The actual temp/humid sensor is sold separately (in most cases).

Posted on December 31, 2017 and filed under Gadgets, Hardware, Programming, Raspberry Pi, Tips'n Tricks, Domotica.

Internet of Things (IoT) and Ransomware

Unfortunately, and no matter how funny the cartoon may be, this may be what the future is going to bring us if we're not careful.

Below are some of the online appliances (just random picks from Google):

The only item I couldn't find was the Internet-connected broom. But I guess that won't take long. The other items can all be bought with some sort of Internet connectivity, and are therefore potential vulnerable for abuse.

Posted on October 10, 2016 and filed under Annoying, Gadgets, Hardware, Internet, Security.

Disable Fritzbox Provider Services

This weekend went my Internet (VDLS) down. The DSL part was still up, but the IPv4 connectivity (over PPPoE) was down. When I checked the Fritzbox (7340) I saw that the DLS had 'trained' on ~100Mbps down and ~30Mbps up. Connection speeds I could only dream of......

Trying to re-establish the IPv4 connection I restarted the DSL modem. Upon reboot, it trained on about 70Mbps download and 30Mbps upload, and the PPPoE tunnel for IPv4 established nicely..... for about 5 minutes.

It turned out that the DSL connection tried to get a better connection, and got it. So starting off at 70Mbps, it could establish a 74Mbps a couple of seconds later, and 75Mbps a bit later after that, and so on, and so on. During this time the PPPoE connection worked like a charm. Until the DSL reached the magical 100Mbps rate. That's when the PPPoE (and the actual IPv4 connection to the Internet) failed.

Posted on May 17, 2016 and filed under Annoying, Hardware, Internet, Tips'n Tricks.

Kodi Media Playback Stops Frequently

Ever since the good-old Popcorn Hour died last year, we've been consuming our media through a Minix media player with XBMC, or Kodi as it's called since version 15. And even though this was a complete package (everything configured and pre-installed), it had a learning curve and required more maintenance than the Popcorn Hour.

A couple of weeks back, we started to experience cut-offs in the media we were consuming. TV shows, and movies stopped for no reason. The image froze, audio cut-out, and the subtitles would go on like nothing was wrong. After a few seconds display goes black, and after 5 to 10 seconds the Kodi-menu would present itself.
At this point we would select play, and the TV show, or movie would continue were it had stopped.

The stopping (or crashing) of the media could occur 1-10 times in a movie and a couple of times in a TV show. One or two times is already annoying, so you can imaging what 10 or 15 'crashes' might invoke....

Posted on December 1, 2015 and filed under Tips'n Tricks, Software, Hardware, Annoying.

Raspberry Pi 2 and PiTFT 480x320 Touchscreen

I'm starting to experiment with the Raspberry Pi form several purposes. For one of my little projects (RTL-SDR Scanner) I need a little TFT screen on the Pi. So I bought the 3.5 inch PiTFT 480x320 Touchscreen.

Getting it to work was not as easy as the tutorial would like it to be. I tried the 'advanced' setup with the DIY Installer script first, but that didn't work at all. The screen stayed bright white. No console or desktop to be found. So after that I tried the easy install where I needed to download an image with all the stuff included.

Posted on June 2, 2015 and filed under Tips'n Tricks, Hardware, Raspberry Pi.