Posts filed under Tips'n Tricks

Add Custom Python3 Modules Path (Windows / MacOS)

After installing Python on Windows or MacOS, the installer makes sure that everything works fine. All paths are available/accessible for Python. Adding modules through pip also works just fine.

The problem is that the paths used are hard to remember (e.g. Windows: c:\Users\<username>\AppData\Local\Programs\Python\Python37\), so if you want to use some custom modules you have to use the (complex) default structure, or you can use your own.

Using your own directories for custom modules requires adding the path(s) to the environment variable PYTHONPATH.

Windows

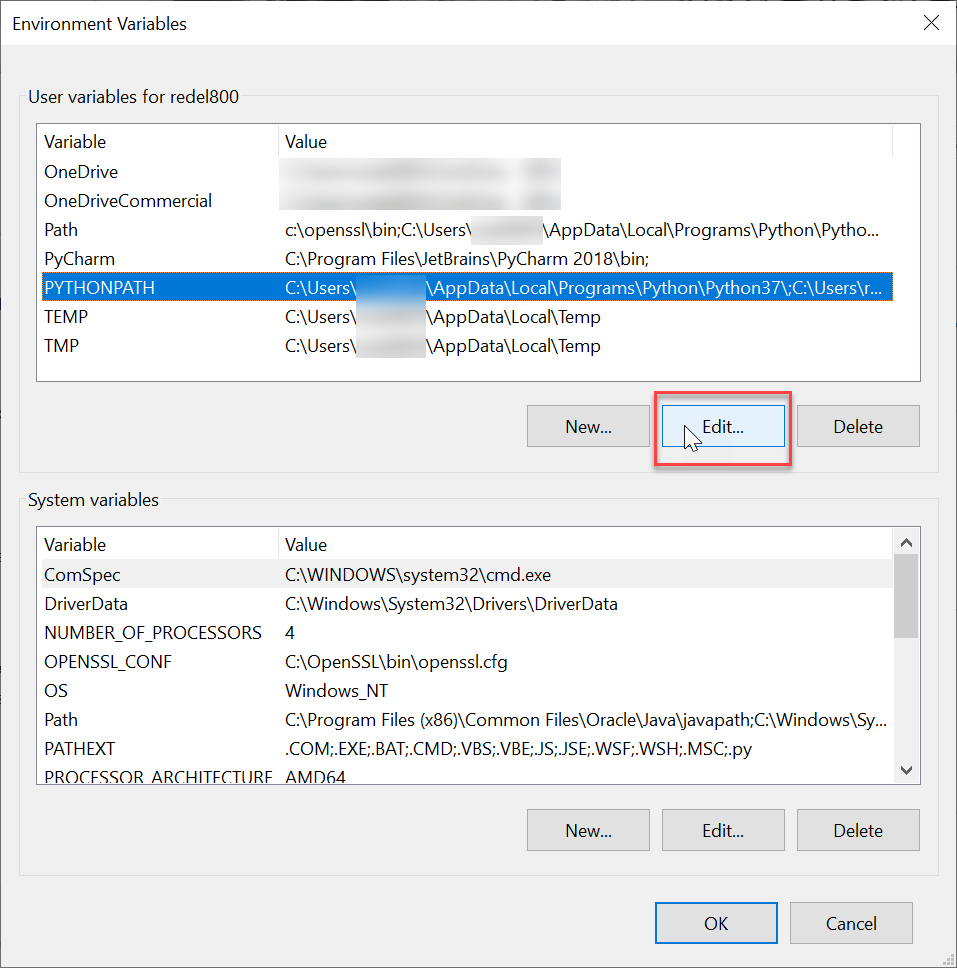
After installing Python, the installer add the PYTHONPATH environment variable to Windows. All you need to do is add your custom path to this variable.

The environment variables can be found through:

This PC -> Properties -> Advanced Settings -> Environment Variables

In screenshots:

MacOS

On my MacOS devices I had to add the path(s) to 2 different files because (regular) GUI based programs (like Pycharm and Python IDLE) use different environment variables than the terminal / console interpreter.

GUI-Based programs

Create a startup plist file (e.g. ~/Library/LaunchAgents/my.startup.plist) and add the following XML content:

<?xml version="1.0" encoding="UTF-8"?>
<!DOCTYPE plist PUBLIC "-//Apple//DTD PLIST 1.0//EN" "http://www.apple.com/DTDs/PropertyList-1.0.dtd">
<plist version="1.0">
<dict>
  <key>Label</key>
  <string>my.startup</string>
  <key>ProgramArguments</key>
  <array>
    <string>sh</string>
    <string>-c</string>
    <string>launchctl setenv PYTHONPATH ~/Python_Scripts/_my_modules</string>
  </array>
  <key>RunAtLoad</key>
  <true/>
</dict>
</plist>

The string ‘~/Python_Scripts/my_modules/’ points to my custom module directory. Edit this to reflect your own directory structure. If you need multiple directories you can add these by seperating them by using a colon (:) e.g.

<?xml version="1.0" encoding="UTF-8"?>
<!DOCTYPE plist PUBLIC "-//Apple//DTD PLIST 1.0//EN" "http://www.apple.com/DTDs/PropertyList-1.0.dtd">
<plist version="1.0">
<dict>
  <key>Label</key>
  <string>my.startup</string>
  <key>ProgramArguments</key>
  <array>
    <string>sh</string>
    <string>-c</string>
    <string>launchctl setenv PYTHONPATH ~/Python_Scripts/_my_modules:~/Desktop/my_scripts</string>
  </array>
  <key>RunAtLoad</key>
  <true/>
</dict>
</plist>

To makes these changes active you can either reboot, log-out/log-in or execute the following command:

launchctl load ~/Library/LaunchAgents/my.startup.plist

Terminal / Console

For the terminal / console based Python interpreter you need to add some lines to the ~/.bash_profile or ~/.zprofile file (depending wether you use bash or zsh as shell).

PYTHONPATH="~/Python_Scripts/_my_modules:$"
export PYTHONPATH

Multiple directories can (again) be added by using the colon seperator (:):

PYTHONPATH="~/Python_Scripts/_my_modules:~/Desktop/my_scripts:$"
export PYTHONPATH

To activate this, just quit the open terminal/console windows (CMD-q) and open it again.

Posted on November 7, 2019 and filed under Programming, Tips'n Tricks.

Cisco ISE MAC Addresss Database Clean Up

Imagine having 15.000+ MAC addresses in a Cisco ISE database. All these MAC addresses are used to gain access to wireless networks protected with WPA2-PSK and MAC-filtering. But how to make sure that they are all (still) valid?

Remove MAC Addresses After Change In Authentication

Finally, the time has come to implement 802.1x on the wireless network for a substantial amount of these devices. These devices are consist mainly of Windows machines or Thin Clients. Both of those are managed through either the Microsoft Active Directory or a Thin Client Management Suite. So, applying setting related to 802.1x are pretty straight forward to distribute. There are however some Windows / Thin client devices that will remain on the MAC-filtering wifi networks for numerous reasons.

After a few tests the migration of the new 802.1x devices has started, but is leaving us with a MAC Address database filled with addresses that can be removed, since they are no longer used…. But how to do that? Cisco ISE has a lot of features, and is capable of generating rich reports about almost everything. However it has no way of reporting on dot1x devices that might still remain in the MAC address database as well. That is where I had to become creative.

First I explored the Cisco ISE Monitoring API, but that only gives active connections. There’s no way of exploring past (successful) authentications/authorizations. I needed a way to get current and past successful dot1x authentications and compare the MAC addresses associated with those entries to the MAC address database, and remove those from that database.

Eventually, I found two paths to accomplish this; First through the reporting module. There you can export all RADIUS authentications to CSV. Filtering these results in Excel, or through Python scripting, you are able to extract the MAC Addresses that successfully authenticated with dot1x. Feed these MAC addresses to a script and remove them through the Cisco ISE ERS API. Or if you’ve got nothing else to do; do it by hand.

The other path is by following the syslog output and parsing that feed. The downside to this is that you have to have syslog file access or add an additional syslog server to Cisco ISE that you may access (e.g. your scripting machine). The syslog version makes a a bit more tricky, since the (syslog)log lines are very long and you have to combine the correct lines to get the full message. Parsing CSV is much easier, so I followed that path first.

Dormant/Obsolete MAC Addresses

Another issue with static MAC addresses (and even local accounts) is that they tend to remain indefinitely in the MAC database. Lang after devices have been decommissioned, the MAC address remains. Which leaves a security hole to be exploited.

By using the generated ‘RADIUS Authentications’ reports over a longer time (e.g. 90 days) you can do a cross reference with MAC addresses in the database and recent successful authentications of that MAC address.
There are some caveats though;

  1. you need a session-timeout on the network (either statically defined on the network device) or by RADIUS return attribute, so that devices have to re-authenticate periodically. Otherwise you might not see a valid device in the logging and removed it by mistake.

  2. RADIUS Reporting goes only 30 days back, so you have to combine several (scheduled) reports to achieve a longer time span. There used to be a custom time frame option, but seems to have disappeared in version 2.6

Increase Ubuntu VM Disk Space

I ran into a very familiar problem (for me anyway) on an Ubuntu 18 virtual machine today. It started with, what I thought was, a Cisco ISE issue. Cisco ISE reports that I wanted to write to a repository ended up as empty files (0 bytes). Initial thought was that I ran into an Cisco ISE bug related to repositories, but it turned out that my Ubuntu server had run out of disk space;

Err:2 http://archive.ubuntu.com/ubuntu bionic-updates InRelease
  Error writing to output file - write (28: No space left on device) [IP: 91.189.88.24 80]

A quick df -h revealed that my Ubuntu server had only 4GB (out of the 100GB I assigned in VMWare).

willem@ubuntu:~$ df -h
Filesystem                         Size  Used Avail Use% Mounted on
udev                               967M     0  967M   0% /dev
tmpfs                              200M  1.1M  199M   1% /run
/dev/mapper/ubuntu--vg-ubuntu--lv  3.9G  3.9G    0M 100% /
tmpfs                              997M     0  997M   0% /dev/shm
tmpfs                              5.0M     0  5.0M   0% /run/lock
tmpfs                              997M     0  997M   0% /sys/fs/cgroup
/dev/loop0                          90M   90M     0 100% /snap/core/7713
/dev/loop1                          90M   90M     0 100% /snap/core/7917
/dev/sda2                          976M  222M  688M  25% /boot
tmpfs                              200M     0  200M   0% /run/user/1000
ubuntuvm-disk-size.png

So, now I had to add the unassigned 96GB to the Ubuntu filesystem. Thankfully, askubuntu to the rescue.

root@ubuntu:~# lvm
lvm> lvextend -l +100%FREE /dev/mapper/ubuntu--vg-ubuntu--lv
  Size of logical volume ubuntu-vg/ubuntu-lv changed from 4.00 GiB (1024 extents) to <99.00 GiB (25343 extents).
  Logical volume ubuntu-vg/ubuntu-lv successfully resized.
lvm> exit
  Exiting.
root@ubuntu:~# resize2fs /dev/mapper/ubuntu--vg-ubuntu--lv
resize2fs 1.44.1 (24-Mar-2018)
Filesystem at /dev/mapper/ubuntu--vg-ubuntu--lv is mounted on /; on-line resizing required
old_desc_blocks = 1, new_desc_blocks = 13
The filesystem on /dev/mapper/ubuntu--vg-ubuntu--lv is now 25951232 (4k) blocks long.

root@ubuntu:~# df -h
Filesystem                         Size  Used Avail Use% Mounted on
udev                               967M     0  967M   0% /dev
tmpfs                              200M  1.1M  199M   1% /run
/dev/mapper/ubuntu--vg-ubuntu--lv   98G  3.4G   91G   4% /
tmpfs                              997M     0  997M   0% /dev/shm
tmpfs                              5.0M     0  5.0M   0% /run/lock
tmpfs                              997M     0  997M   0% /sys/fs/cgroup
/dev/loop0                          90M   90M     0 100% /snap/core/7713
/dev/loop1                          90M   90M     0 100% /snap/core/7917
/dev/sda2                          976M  222M  688M  25% /boot
tmpfs                              200M     0  200M   0% /run/user/1000
root@ubuntu:~# 
Posted on October 16, 2019 and filed under Linux, Tips'n Tricks.

Cisco ISE v2.6 and Google ChromeOS

While playing around with the new Cisco Identity Service Engine (ISE) v2.6 (patch2) I stumbled upon a security feature while testing Wireless 802.1x access with an Acer Chromebook (ChromeOS v75.0.3770.144). When connecting to the 802.1x enabled SSID the connection failed, while other devices (Windows 10, Apple iOS and MacOS) connected just fine.

The problem is the client EAP handshake and usually this relates to untrusted server certificates. This happens to me a lot since I use different RADIUS services for my testing SSID’s.
So after clearing the SSID settings (forget) on the Chromebook it should work, but it didn’t.

The logging showed that the EAP handshake failed because the client didn’t offer a suitable cipher to the ISE server.

Turns out that Cisco ISE v2.6 has SHA1 disabled by default, and you need to enable it in:

Administration -> System -> Settings -> Security Settings

With the setting ‘Allow SHA1 Ciphers’, and ‘Allow only TLS_RSA_WITH_AES_128_CBC_SHA’ the Chromebook was able to connect to the 802.1x enabled SSID using old/depricated ciphers.

Now I wonder why the Chromebook still uses SHA1 based ciphers for secure communications, since Google Chrome started to abandon SHA1 as one of the first browsers….

Even installing the ‘Powerwash for added security’ feature in ChromeOS didn’t enable or add stronger ciphers on the Chromebook.

Posted on July 31, 2019 and filed under Tips'n Tricks, Security.

Install Cisco Identity Services Engine v2.4 From USB

The Cisco Identity Service Engine (ISE) is a NAC solution used for accessing the network. The version (while writing this post) is v2.4.

For a new implementation of Cisco ISE I had to re-image 2 SNS-3595 appliances with the latest software. This can be done in various ways;

  1. Write the ISE iso to USB and boot / install from the USB flash-drive

  2. Use the JAVA/HTML5 KVM option through the CICM interface

  3. Hookup a USB DVD player with a dual-layer DVD containing the appropriate ISO file

The preferred option is the USB flash-drive, since it’s the fastest, but only if you are able to boot from USB….. After trying several USB flash drives with the tool recommended in the Cisco manual I gave up. No way that the Boot menu saw the USB flash drive. So after wasting several hours doing that I opted for the KVM install method.

Juniper SRX, Virtual Routers, and SNMPv3

In this continuing story about Junos and virtual routers an episode about SNMPv3.

A simple SNMPv3 config for Junos would be the following:

set snmp v3 usm local-engine user authpriv authentication-md5 authentication-password My_Password_01
set snmp v3 usm local-engine user authpriv privacy-aes128 privacy-password My_Password_02
set snmp v3 vacm security-to-group security-model usm security-name v3test group v3test
set snmp v3 vacm security-to-group security-model usm security-name authpriv group v3test
set snmp v3 vacm access group v3test default-context-prefix security-model any security-level authentication read-view v3testview
set snmp v3 vacm access group v3test default-context-prefix security-model any security-level authentication write-view v3testview
set snmp v3 vacm access group v3test default-context-prefix security-model any security-level authentication notify-view v3testview
set snmp v3 vacm access group v3test default-context-prefix security-model any security-level privacy read-view v3testview
set snmp v3 vacm access group v3test default-context-prefix security-model any security-level privacy write-view v3testview
set snmp v3 vacm access group v3test default-context-prefix security-model any security-level privacy notify-view v3testview
set snmp v3 snmp-community v3test security-name v3test
set snmp view v3testview oid system include
set snmp view v3testview oid .1 include

Authenticating with the correct credentials (U: authpriv, P: My_Password_01) will give results in a single (default) virtual router.

Using this config in a multiple VR environment will result in Authentication and/or authorization errors. Reason being the not using the root/single VR configuration.

Adding some details to the config, AND altering the actual SNMPv3 query will solve that.

set snmp v3 usm local-engine user authpriv authentication-md5 authentication-password My_Password_01
set snmp v3 usm local-engine user authpriv privacy-aes128 privacy-password My_Password_02
set snmp v3 vacm security-to-group security-model usm security-name authpriv group v3test
set snmp v3 vacm access group v3test context-prefix DEFAULT security-model any security-level authentication read-view v3testview
set snmp v3 vacm access group v3test context-prefix DEFAULT security-model any security-level authentication write-view v3testview
set snmp v3 vacm access group v3test context-prefix DEFAULT security-model any security-level authentication notify-view v3testview
set snmp v3 vacm access group v3test context-prefix DEFAULT security-model any security-level privacy read-view v3testview
set snmp v3 vacm access group v3test context-prefix DEFAULT security-model any security-level privacy write-view v3testview
set snmp v3 vacm access group v3test context-prefix DEFAULT security-model any security-level privacy notify-view v3testview
set snmp v3 snmp-community v3test security-name v3test
set snmp view v3testview oid system include
set snmp view v3testview oid .1 include
set snmp routing-instance-access access-list DEFAULT

The main differences are:

  • context-prefix <VR-NAME>
  • snmp routing-instant-access access-list <VR-NAME>

Having done that, AND adding a context parameter to the actual query will give the correct results.

Posted on June 27, 2018 and filed under Junos, Security, Tips'n Tricks.

Juniper SRX, Routing Instances, and Syslog Challenges

In the previous post I described the issue I had with routing instances and DHCP-relay, and how I fixed it. It turns out that DHCP-relay wasn't my only problem. Turns out that syslog also stopped at the time I implemented the routing instances.

Syslog-gap

To solve this I needed to inject the route to my syslog server (Splunk) in the global routing instance by using policy options.

set policy-options policy-statement syslog-policy term 10 from instance DEFAULT
set policy-options policy-statement syslog-policy term 10 from route-filter 192.168.20.0/24 exact
set policy-options policy-statement syslog-policy term 10 then accept
set policy-options policy-statement syslog-policy then reject

set routing-options instance-import syslog-policy
Posted on June 25, 2018 and filed under Annoying, Security, Tips'n Tricks.

Juniper vSRX Firewall and VMWare Workstation 14

For a work related project, I wanted to run the Juniper vSRX firewall (v15.1X49-D110) on my work laptop by using VMWare Workstation Pro 14. Unfortunately, the installation (importing the Juniper vSRX OVA file resulted in a VMWare Workstation crash.

Enhancing Sonoff TH16 Functionality and Domoticz Integration

In my previous blogpost, the Sonoff worked, but was lacking a manual override. The switch could only be triggered by Domoticz. Since it also has a physical push button (connected to GPIO0 (D3)), it can be switched by hand. All that needs to be done is:

  1. Create a new switch device in the Sonoff
  2. Enable 'Rules' in the Tools / advanced settings
  3. Create a rule
  4. Change the On/Off commands in the switch parameters in Domoticz
Posted on January 1, 2018 and filed under Hardware, Programming, Raspberry Pi, Tips'n Tricks, Domotica.

Flashing the Sonoff TH16 Wireless Switch

The Sonoff TH16 is an inexpensive piece of hardware that can be controlled over WiFi. Apart from the switch (that's capable of handling electrical currents up to 16A) there's an interface for temperature and humidity. The actual temp/humid sensor is sold separately (in most cases).

Posted on December 31, 2017 and filed under Gadgets, Hardware, Programming, Raspberry Pi, Tips'n Tricks, Domotica.